Motorcycle carburetor jetting, introduction, theory, and troubleshooting
 The very basic operation of a carburetor at a constant engine speed
PRELUDE:
When jetting a motorcycle carburetor, it is always best to return the carburetor back to the factory settings per the factory service manual (or equivalent aftermarket publication like Clymer or Haynes). I cannot stress this enough, nearly ALL motorcycles produced have a service manual available in some form either used or new, digital or print. Before attempting ANY sort of repair it is best to obtain a service manual for proper specifications for your particular motorcycle. Below is general information concerning overall jetting of the carburetor. If you are having drive-ability issues in one specific RPM range or throttle opening it is best to focus on that specific area and the adjustments that pertain to that specific area. It goes without saying, that when making any adjustments that you make only one change at a time and test the results. Making more than one change at a time will only complicate the diagnosis and prolong the time it takes to fix the issue. It is also advisable to read not only this page but the service manuals trouble shooting guide and fully understand how minor changes affect each area of the jetting. Fully understanding the what and why of how the air and fuel moves through the carburetor will aid in the diagnosis of what adjustments may need to be made. It must be noted that unless the motorcycle has major modifications done to the engine, intake tract or exhaust tract, jetting will not deviate too much away from the factory specified settings. Most jetting problems can be fixed with a proper cleaning, replacement of any worn items, and a reset to the factory specs. See my Getting an old bike running again video for some helpful tips. And even before that please check out How to clean the entire fuel system.
When jetting a motorcycle carburetor, it is always best to return the carburetor back to the factory settings per the factory service manual (or equivalent aftermarket publication like Clymer or Haynes). I cannot stress this enough, nearly ALL motorcycles produced have a service manual available in some form either used or new, digital or print. Before attempting ANY sort of repair it is best to obtain a service manual for proper specifications for your particular motorcycle. Below is general information concerning overall jetting of the carburetor. If you are having drive-ability issues in one specific RPM range or throttle opening it is best to focus on that specific area and the adjustments that pertain to that specific area. It goes without saying, that when making any adjustments that you make only one change at a time and test the results. Making more than one change at a time will only complicate the diagnosis and prolong the time it takes to fix the issue. It is also advisable to read not only this page but the service manuals trouble shooting guide and fully understand how minor changes affect each area of the jetting. Fully understanding the what and why of how the air and fuel moves through the carburetor will aid in the diagnosis of what adjustments may need to be made. It must be noted that unless the motorcycle has major modifications done to the engine, intake tract or exhaust tract, jetting will not deviate too much away from the factory specified settings. Most jetting problems can be fixed with a proper cleaning, replacement of any worn items, and a reset to the factory specs. See my Getting an old bike running again video for some helpful tips. And even before that please check out How to clean the entire fuel system.
This is a primer video and should be watched first, then move on to the other videos.
General jetting or troubleshooting guidelines:
Adjusting for altitude: Generally speaking standard jetting specs (provided in the service manual) are good for up to 6,000 feet above sea level. Over this and some jetting changes might be needed. Typical adjustment can be achieved with a leaner (smaller numbered) Main Jet and a re-setting of the idle speed mixture for a quality idle at higher elevations. For elevations that are closer to seal level may require a richer (larger numbered) Main Jet.
Typical results of a RICH or LEAN mixture
RICH:
Excessive black smoke from exhaust
Engine performance is "doggy" or miss-firing at certain throttle openings
Black or soot coated spark plug, fouled plug from the soot. Not to be confused with black oily plug which indicates oil burning from worn rings in a 4 stroke or running incorrect type of oil in a 2 stroke pre-mix.
Engine performance declines as the engine warms up
Running with the choke or starting enrichment engaged stalls the engine or it continues to run more poorly
Lean:
Overheating
Poor acceleration
Engine runs better with the choke or starting enrichment engaged
Engine RPMs are erratic when holding at any throttle opening
Spark plug exhibits a whitish color
NOTE: Dirty fuel, clogged jets/fuel line/petcock/carburetor passages will exhibit LEAN conditions as well. Improper float height setting (too high) or leaky or worn float needle valve will exhibit a RICH condition as well. The Carburetor and fuel system must be functioning correctly before any subsequent jetting adjustments.
A clean fuel system is the first thing to do before diagnosing ANY carburetor problem
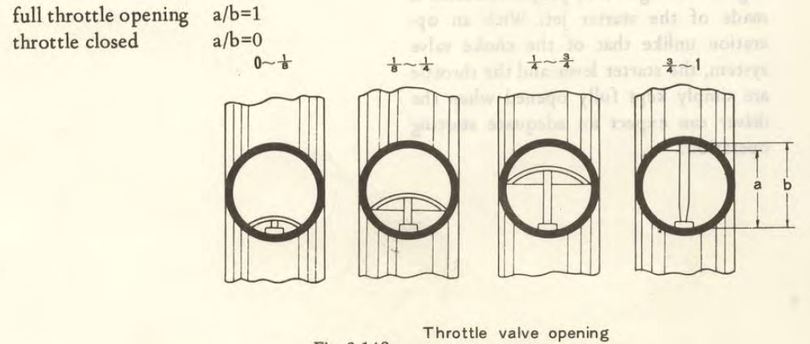
The first step in understanding your carburetor and how it operates is to describe the throttle slide (or valve) openings. Breaking them down into sections will help later in diagnosing where the jetting problem is happening and thus what adjustments are in play at each throttle opening. Everything involving diagnosis and jetting builds off of these definitions.
The throttle openings are as follows: 0-1/8 1/8-1/4 1/4-3/4 3/4-1 "0"= throttle closed or idle speed "1"= throttle fully open or WOT (wide open throttle)
The throttle openings are as follows: 0-1/8 1/8-1/4 1/4-3/4 3/4-1 "0"= throttle closed or idle speed "1"= throttle fully open or WOT (wide open throttle)
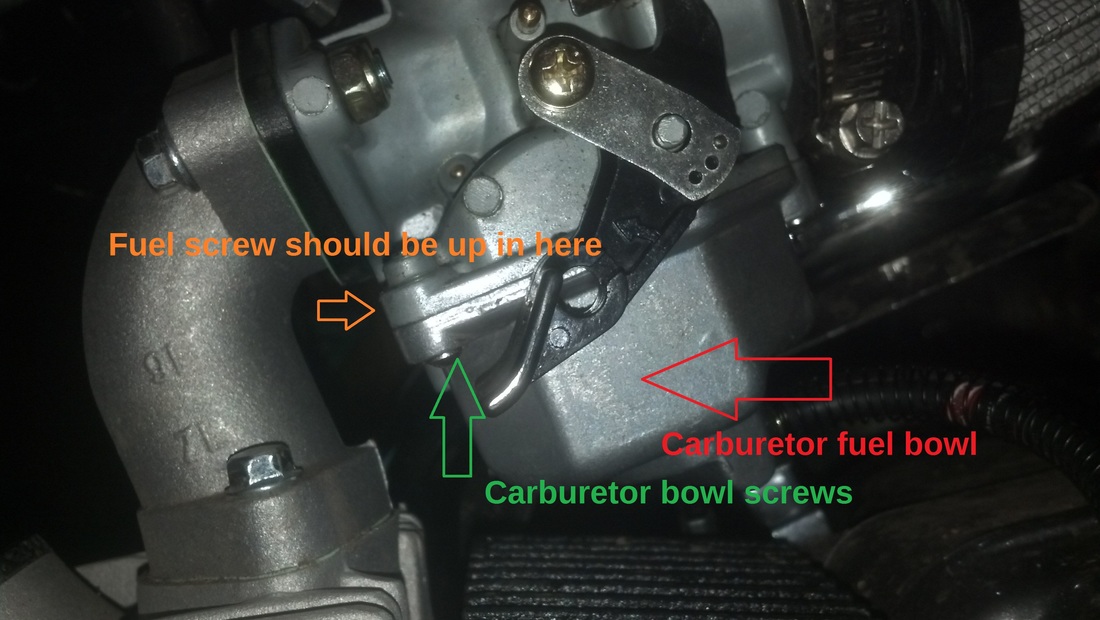
Below is a diagram with general pictures of some of the parts in a typical carburetor that affect jetting. The carburetor slide (or valve) has a cut-away and moves up and down within the bore of the carburetor to control the AIR flow through the carburetor venturi (see above). The throttle cable is usually directly connected to the slide, in a CV type carburetors it is directly connected to a rubber diaphragm that is vacuum operated. The Jet Needle is a tapered rod with graduated steps on one end that the retaining clip fits into. The Main Jet is a threaded a brass fitting with a precise hole in the center that the FUEL flows through, it will also be stamped somewhere with a number, this number denotes the size of hole within the jet. The Pilot Jet (not pictured) is similar to the main jet but much smaller and usually resides within a small cavity directly next to the Main Jet holder.
Float height adjustment: A service manual is a requirement to properly adjust the float height on a motorcycle. Every motorcycle is slightly different in the correct measurement value. Below is a chart that illustrates the typical float height measurement points and where to make the adjustment for the proper height. The float valve controls the amount of fuel that can enter the float bowl chamber.
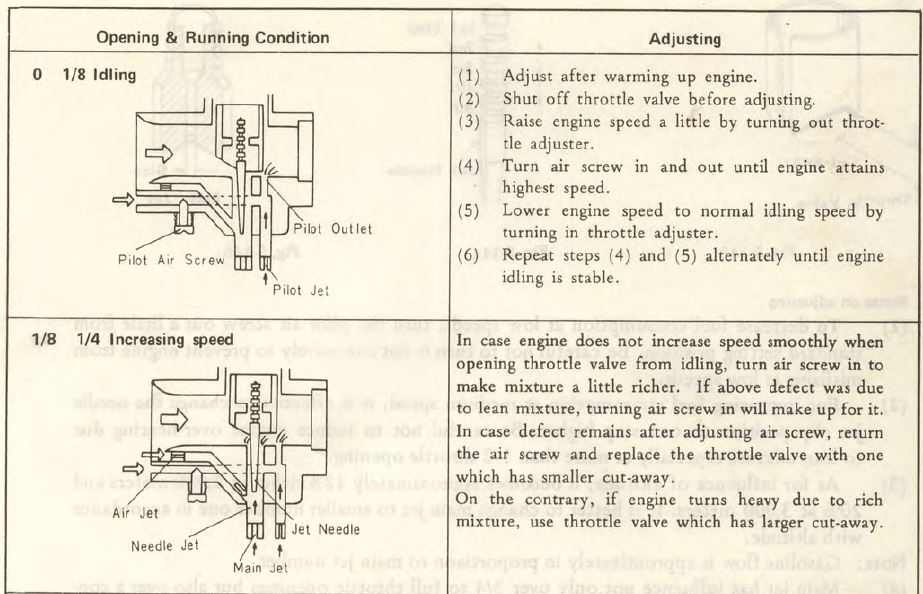
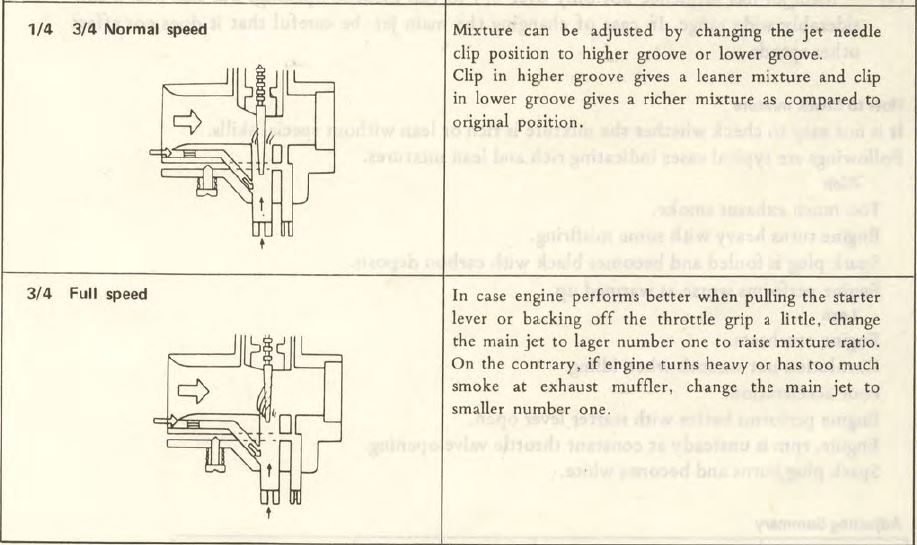
Below is a simple chart with some explanations of each stage of the throttle opening and what parts are in operation at a given throttle opening. This can help narrow down which parts may be required to change or adjust for a specific jetting problem. A thorough carb cleaning is mandatory before using the following information.
|
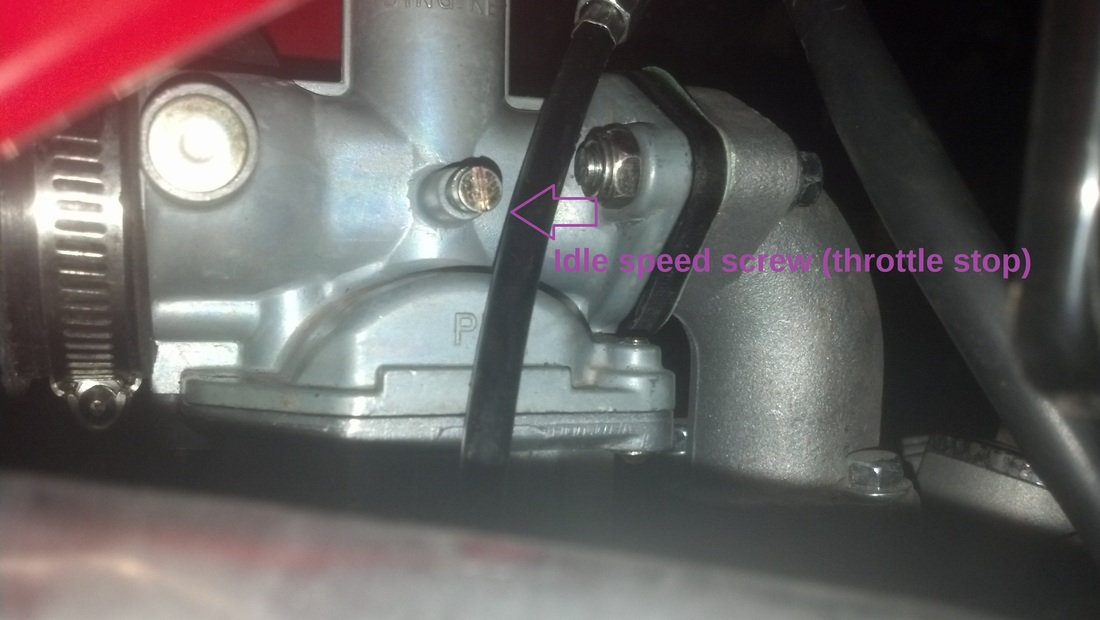
0-1/8 throttle opening: Adjustments that are in operation. Pilot Jet, Pilot circuit adjustment screw. This adjustment screw can be either an AIR screw or a FUEL screw. Watch my Idle Mixture Adjustment video for proper explanation on this adjustment. 1/8-1/4 throttle opening: Adjustments that are in operation. Main Jet, Jet Needle, Pilot Jet (lesser extent than before). The main jet is now beginning its operation but fuel is metered through the main jet by the jet needle's profile and position within the slide (or valve) this is known as the "clip position" referring to the retaining clip on the needle. 1/4-3/4 throttle opening: Adjustments that are in operation. Main Jet, Jet needle. The main jet is now becoming more prominent in its affect on the overall jetting, however the Jet Needle is still controlling the flow of fuel throw the main jet passage. The Jet Needle clip position can have a profound affect on the jetting through this range. 3/4-1 (WOT) throttle opening: Adjustments that are in operation. Main Jet. The Jet Needle has very little if no discernible effect on the jetting through this range. |
Spark Plug reading
a visual how to
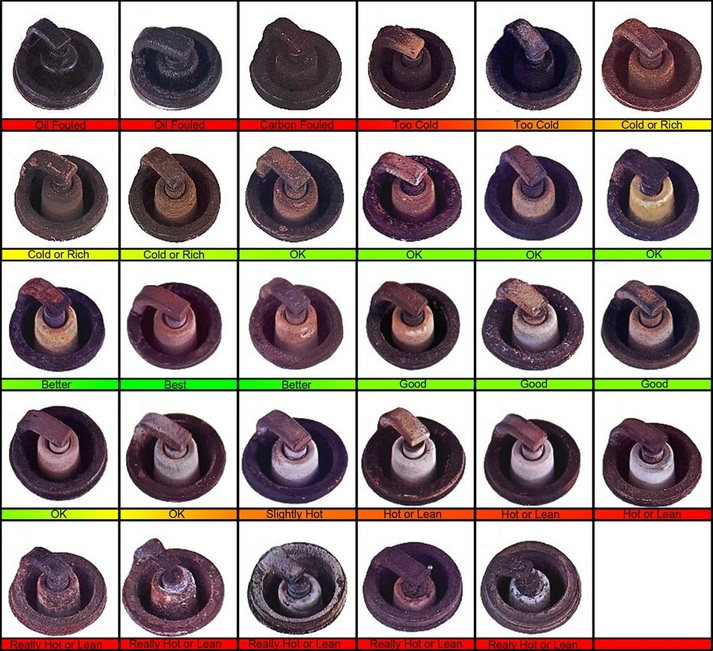
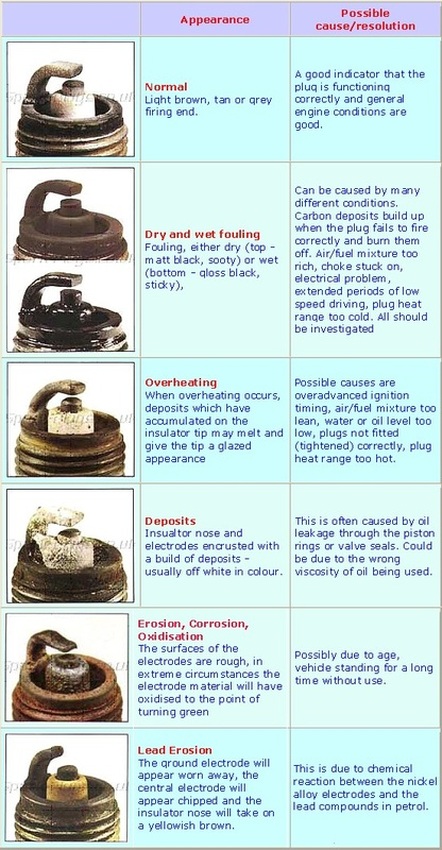
Spark plug insulator should be a nice uniform tan or brown color if the mixture is just right. Below is some good charts to help read the spark plug and determine what adjustments to make.
a visual how to
Spark plug insulator should be a nice uniform tan or brown color if the mixture is just right. Below is some good charts to help read the spark plug and determine what adjustments to make.


